Rotator cuff tear - diagnosis & treatment
It’s understandably worrying to be told that you have a tear in one of your shoulder muscles (the rotator cuff).
However, rotator cuff tears are incredibly common with nearly a quarter of the general population having one and only one third of these actually experiencing any pain as a result.
Simply put, having rotator cuff tear without any pain is twice a common as having a tear which causes pain. In fact, the majority of people might not even realise they have one.
What can cause a torn rotator cuff?
You can develop a tear through two main routes. The first is through sudden injury, like a fall or an awkward tackle. The second, and most common cause, is more gradual and happens as a result of accumulative strain in one part of the cuff as it ages along with the rest of your body.
How do you know if you have a rotator cuff tear?
One of the main symptoms is weakness, the extent of which depends on how big the tear is.
If you have a small tear you may struggle with twisting movements of the shoulder. You can test for it like this:

Face a mirror and keeping your elbows bent, move your hands out to the sides. If there is a loss of movement on one side, use your other hand to see if you can move your arm a bit further outwards. If you can achieve a bit more movement with the help from your other arm but you can’t hold it out there on its own, then it’s possible that you have a muscle tear.
Bigger tears lead to difficulty with lifting your arm upwards or out to the side. An ultrasound scan is the most accurate way to determine the size of a tear.
What’s the best treatment?
If your shoulder is painful then in the early stages, you should avoid all activities which aggravate your symptoms. Take medication as often as you need to control your pain and allow your symptoms to settle as quickly as possible.
If your tear happened after an injury or you have a large tear, then you may be offered surgery but physiotherapy treatment is usually very successful if you have a small or medium sized tear.
How long will it take to heal and what are the best exercises?
An experienced physiotherapist will be able to guide you through a safe, effective rehabilitation programme. Initially this is likely to focus on restoring the normal movement in your shoulder joint. The next step is to make sure that the muscles around your shoulder blade are not only strong but that they’re working properly with the other muscles around your shoulder to produce smooth and well- coordinated shoulder movement. A strengthening programme can then be introduced gradually to restore power, speed and precision.
There’s no set time frame for recovery from a rotator cuff tear and your progress should be monitored carefully. Pushing yourself too hard, too soon has the potential to make the tear worse.
If you suspect you might have a rotator cuff tear or you have any questions at all, please don’t hesitate to get in touch,
The Physiofit Team!
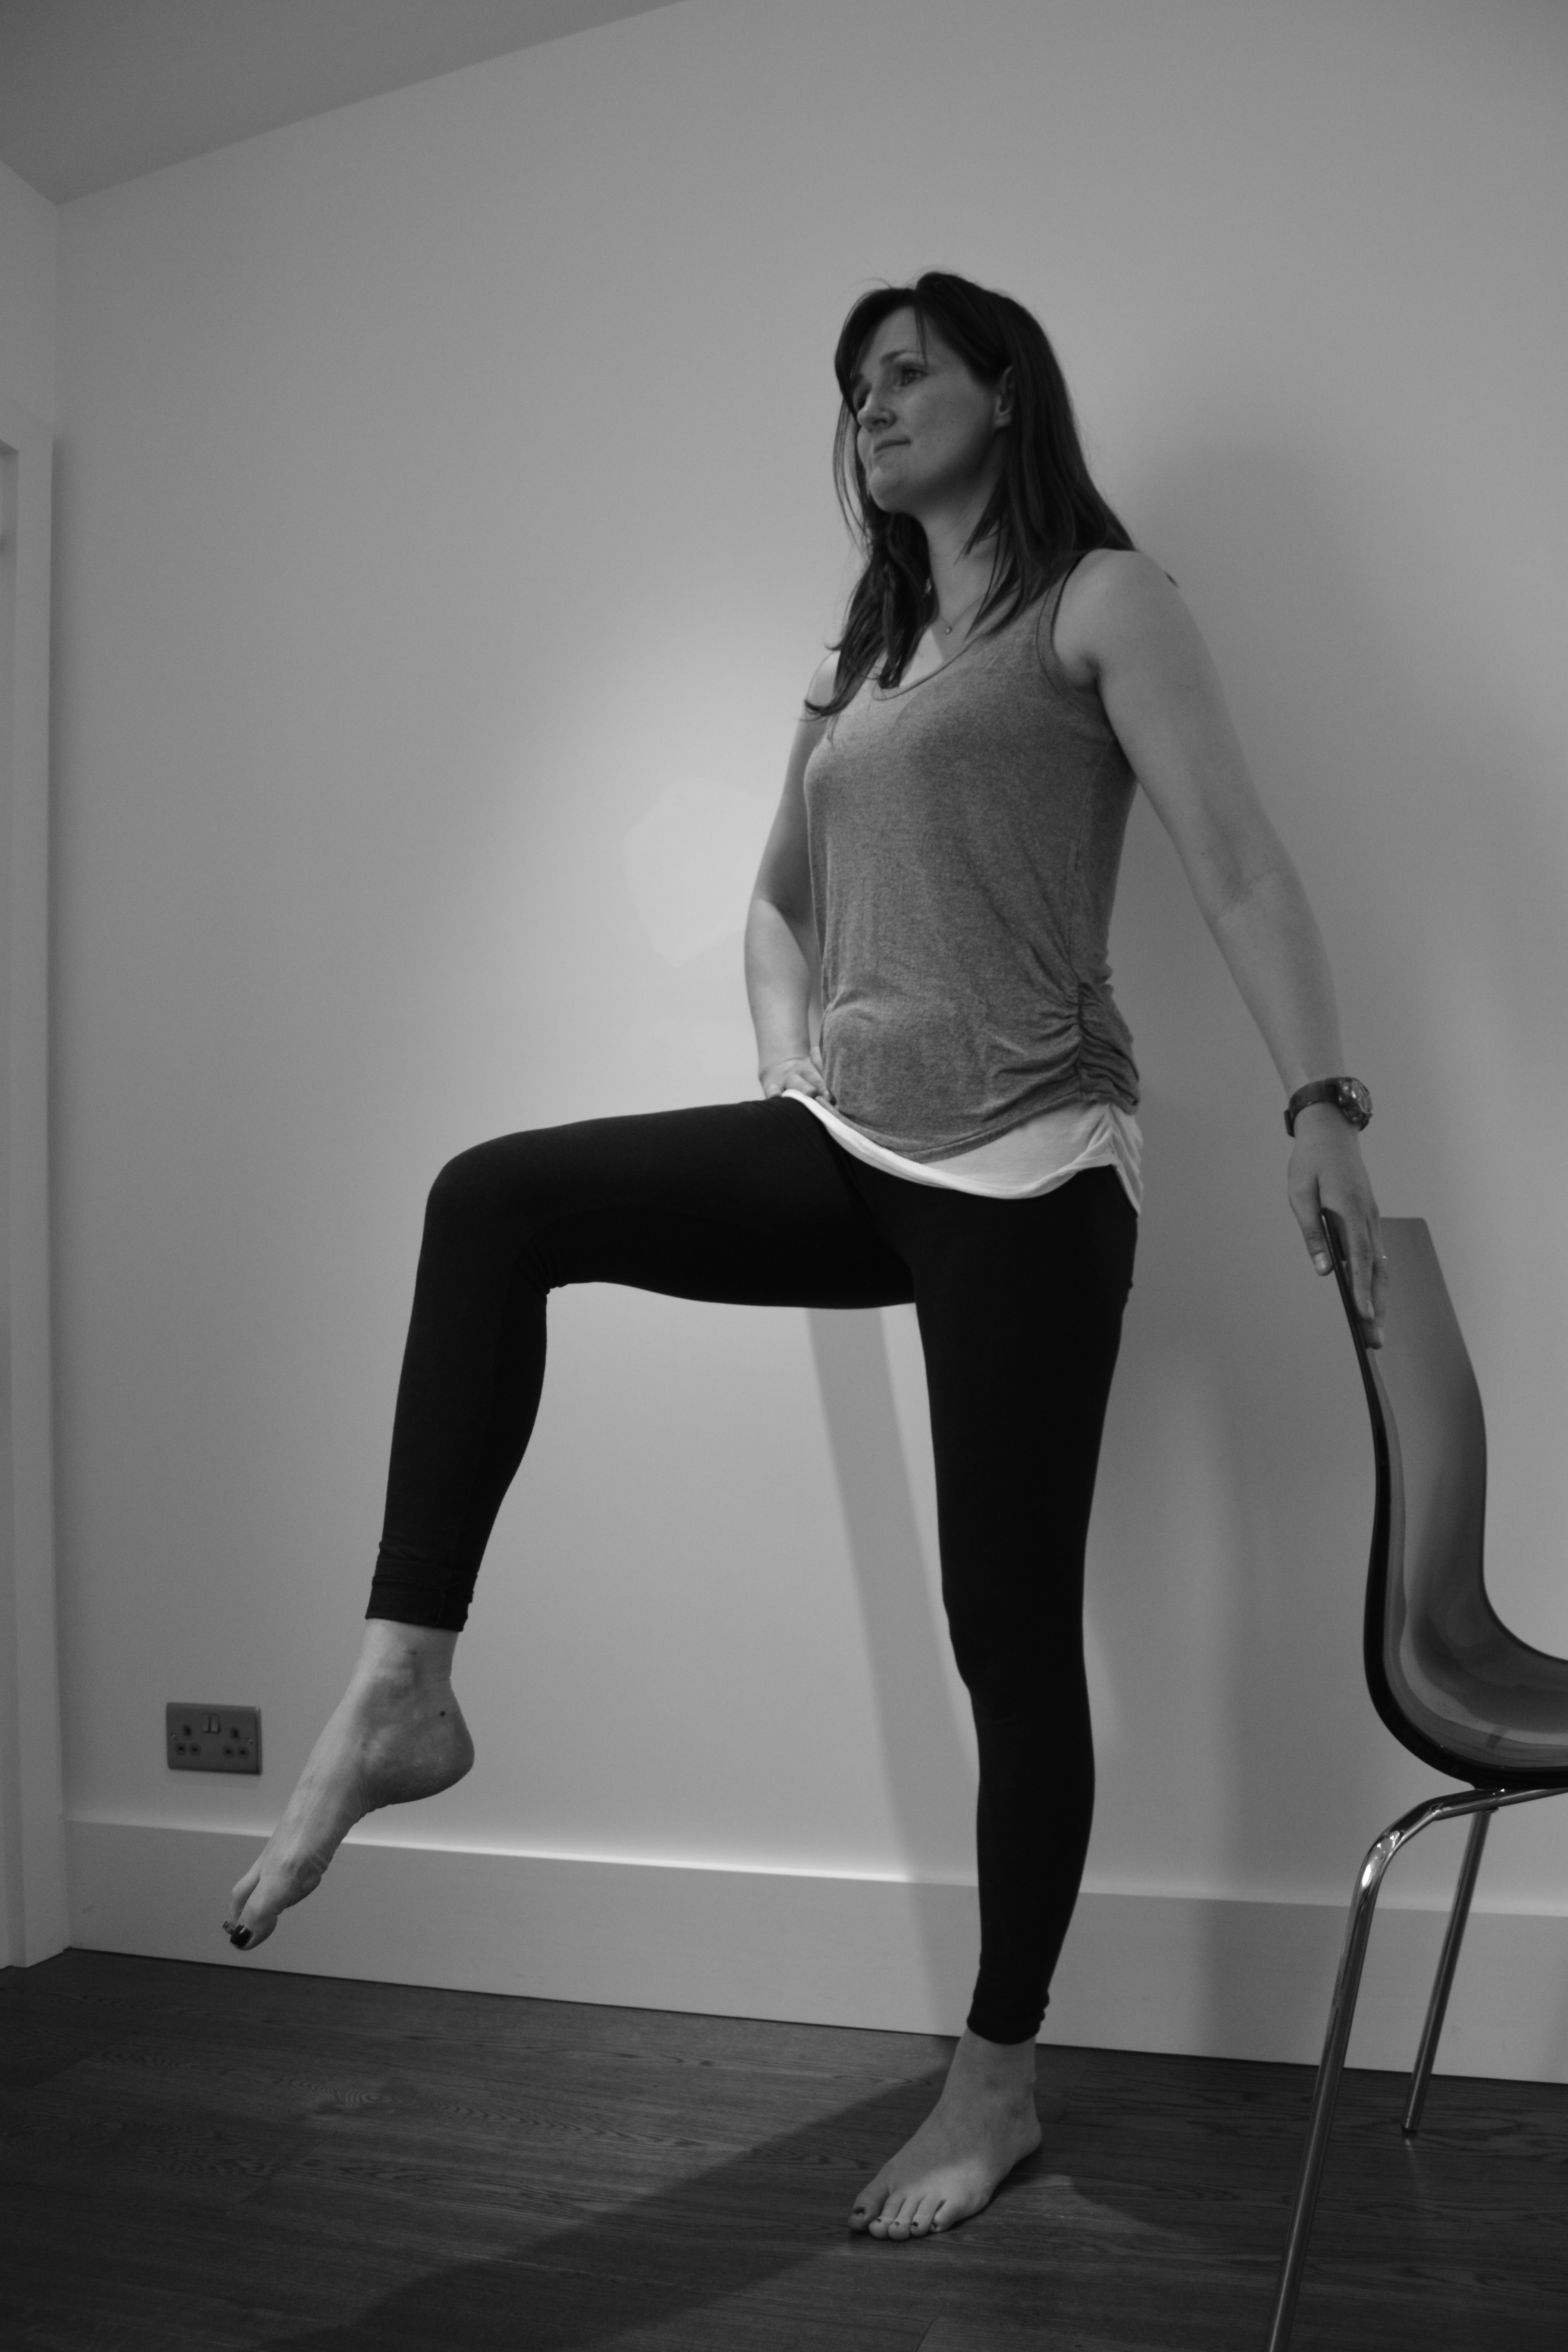
What are the best exercises to improve balance?
Many adults find that their balance deteriorates as they get older and they become fearful of falling.
The body systems that contribute to balance and mobility do change with age, but growing older doesn’t necessary mean becoming weaker or less able to do things that require good balance.
There are lots of things that contribute to your ability to balance when you are on your feet and moving around. We are provided with constant information about the environment and our movements from our eyesight, the balance mechanism in our inner ear and the system that tells us where we are in relation to other objects (somatosensory system).
Ageing can affect how well those systems work independently but can also impact on how well these systems interact with each other. For example, a 67-year-old man who usually runs twice a week finds that since his cataract has worsened he has become unsteady on his feet. He is strong, fit and mobile but not being able to see clearly has impacted on his balance as the visual information is less accurate and therefore his brain has to rely on the other two systems to maintain balance. It’s like standing with your eyes closed … try it for yourself and you’ll see how much harder it it!
Feeling unsteady on your feet can really knock your confidence and you may find yourself avoiding activities that feel more challenging. Unfortunately, this can make the problem worse as you may then also lose some strength and flexibility, which are also factors which contribute to your ability to balance. It’s a vicious cycle.
Muscle weakness is a common factor contributing to lose of balance, so here are a few examples of the kind of exercises that might be recommended to you.
When you first start, use a chair or bannister for support and as you get stronger and more confident you can gradually reduce the support you need for each exercise. Repeat each exercise 8 - 10 times.
Leg lift
Keep your knee straight and lift your leg on the side, keeping your toes pointing forwards.
High knee marching
Bend your knee and lift your thigh towards your chest, lower again and repeat with your other leg. Repeat
Heel and toe raisers

First push up onto tiptoes, lifting your heels up off the floor. Lower again and lift your toes up off the floor.
Sit to stand

Perch on the edge of a chair. Lean forwards bending your hips until your nose is over your toes. Push through your heels to stand up. Lower again slowly, bending at the hips and pushing your bottom back behind you.
Tips: Initially you can use your arms to help but as you get stronger try to stand up without using your hands.
Take home message …
There are lots of factors that may contribute to an impaired ability to balance, which can result in a fall.
Strengthening exercises are often recommended but this won’t be effective if your balance problem isn’t due to muscle weakness. This is why a thorough assessment is vital to establish which system (or systems) need to be retrained.
A specialist falls physiotherapist will be able to help you work out which systems are affecting your balance and improve them with an individualised, targeted programme.
Don’t hesitate to contact us if you have any questions at all,
The Physiofit Team!

Golfer's Elbow Pain - symptoms, causes & treatment
Golfer’s elbow is similar to tennis elbow but the pain is felt on the inside of your elbow rather than the outside.
The medical term for golfer’s elbow is medial epicondylitis. It’s a painful problem affecting the tendons that help you grip, so people that use their hands a lot for work – for example, using screwdrivers or a hammer regularly – are prone to developing this condition, along with people who work at a computer.
What are the symptoms of Golfer’s elbow?
If you are experiencing pain on this inside of your elbow which comes on during activities when you are gripping something, twisting your forearm or lifting, then it’s likely that you have golfers elbow. It’s also common to have some tenderness around the bone and your grip might not feel as strong as usual.
Golfer’s elbow self-test
You can try this test to see if you have golfers elbow:

Straighten your elbow and turn your palm up. Keeping your elbow and wrist straight, use your other hand to press down on your palm. If your inner elbow pain increases, then the test is positive.
Golfer’s elbow treatment
Golfer’s elbow gets worse if you push through the pain. So in the early stages you’ll need to make some adjustments to the way you do things to allow your symptoms to settle. This doesn’t mean stopping everything entirely. You can continue to use your arm but some activities might need to be reduced to a level where they can be completed comfortably.
If you have a manual job, this might be difficult but you can try using a golfer’s elbow strap to reduce pain during some tasks. Wrapping tennis racket grip tape around the handle of your tools to increase the diameter of the handle (so you don’t have to grip as hard) can also be helpful.
Using an ice pack at the end of the day will help with pain relief. Something that moulds to your skin like a gel pack or packet of frozen peas is best. Wrap a wet tea towel around the ice pack and apply for up to 10 minutes. Check your skin occasionally and take off the ice pack if your skin goes numb, to prevent an ice burn.
Physiotherapy treatments like acupuncture, taping, myofascial release and deep friction massage can also help to relieve your symptoms.


Wrist strengthening exercises for Golfer’s Elbow
In the early stages, it’s best not to push into pain to exercise the muscles of your forearm. Try this ‘press and hold’ exercise to help relieve pain:

Sit with your elbow bent and resting on the arms of a chair or table. Turn your palm upwards. Press down on your palm with your other hand and upwards with your affected side (so there is no movement). Press and hold for 10 seconds – without pain – and repeat 5 times every hour.
After you’ve finished, stretch out your forearm by straightening your elbow (palm up) and using your other hand to increase the stretch:

Hold this stretch for 30 seconds and repeat three times.
Take home message …
In the short term modifying your activities to reduce pain is vital. A physiotherapist can treat your elbow to relieve your symptoms and will be able to advise on the equipment you use and alternative ways of doing things to prevent your symptoms from recurring.
The exercises we’ve recommended are specifically for golfer’s elbow and not for other types of elbow pain. In fact, some nerve problems can mimick the symptoms of golfer’s elbow, so if your pain doesn’t improve with these exercises it’s a good idea to speak to your GP or arrange an assessment with a physiotherapist to rule this out.
If you think we can help you, please get in touch.
Related Articles
Nothing found.
Share:
Book online or call us on 01223 914140

Total Knee Replacement Surgery - tips & exercises
Replacing your worn out knee joint with an artificial implant can significantly reduce pain and really improve your general quality of life and activity.
However, this doesn’t happen overnight. Although knee replacement surgery is now much more common, it’s still a major operation and it can take time to recover fully.
Milestones – what to expect after your knee surgery and recovery time
Knee bend – you should be able to bend your knee to about 90 degrees when you leave hospital and with the right rehab programme, most people will manage to bend their knee to about 125 degrees within 3 months.
Driving – your consultant is the best person to advise when you will be able to drive again but the majority of people will be able to get behind the wheel after 6 weeks.
Returning to work and daily activities – most of these will be achievable about 6 weeks after your surgery (although this is dependent on your occupation).
Low impact sports – You should be able to get back to low impact activities such as swimming or cycling by 12 weeks post op.
Physiotherapy tips for recovery after your surgery
Pain control
Make sure you take any painkillers which have been prescribed for you regularly. Most people don’t like to feel reliant on medication, but in the first few weeks after your surgery taking your painkillers is really important so you can regain as much knee movement as possible. If you are in pain and can’t move your knee, this can lead to complications and a less successful outcome.
Ice
Your knee will look very large and swollen immediately after your operation. This is normal and to be expected. You can help to relieve the swelling (and pain) by applying an ice pack regularly.
It’s best to use something that can be moulded to your skin like a packet of frozen peas or a reusable gel pack. Wrap it in a wet cloth to prevent direct contact with your skin and leave the ice pack in place for up to 20 minutes. Check your skin occasionally during this time and if it goes numb remove the ice straightaway to prevent an ice burn.
You can reapply every 1-2 hours, allowing your skin time to return to its normal temperature in between treatments.
Walking aids
You will probably need to use a walking aid(frame, crutches or a walking stick) in the early stages. Don’t be tempted to discard it too quickly, it’s better to walk normally using a walking aid then to limp without one.
Stairs
A few tips to make things easier on the stairs … take both legs to each step, leading with your good leg on the way up and your bad leg on the way down.
Early stage exercises after knee replacement
Knee bends

Lie on your back with your operated knee slightly bent. Bend your knee as far as possible, pushing into a mild stretch. You can loop a dressing gown belt round your ankle to help pull your foot a little closer. Hold for 5 seconds then relax.
Straight leg raise

Lying or sitting. Straighten your knee fully by tightening your thigh muscle then lift your leg 10cm off the bed. Hold for 5-10 seconds then relax. Your leg must remain straight throughout this exercise.
Thigh strengthening

Lying or sitting with a rolled towel or cushion under your knee. Breathe out and tighten your thigh muscle to straighten your knee. Hold for 10 seconds and lower again slowly. Repeat 10 times.
Sitting knee extensions
Sit on a chair and straighten your operated knee. Hold for 5-10 seconds then relax.
Standing hip extension

Stand holding onto a support ( a wall or the back of a chair). Push your operated leg backwards, moving from your hip. Do not arch your lower back or lean forwards. You should feel your bottom muscles working. Hold for 5-10 seconds then relax.
While you should be back to doing the majority of your activities at about 3 months, people often find that the full recovery process continues to steadily progress over a period of 1-2 years.
Participating in a structured rehab programme will help you to recover more quickly and in the longer term continuing exercise regularly will help to stabilise and support your new knee. Clinical Pilatesis ideal.
Don’t hesitate to get in touch if you have any questions at all,
The Physiofit Team!

How to get rid of shin splints
With Marathon season underway and the weather warming up, lot of us are dusting off our running gear and heading outside.
Running has fantastic health benefits, it’s easy to do and it doesn’t require much equipment or a gym subscription. However, if you’re new to running – or you’re getting back into it after a break – it’s really important to have a steady training plan for building up the miles.
Training errors such as sudden spikes in your distance, pace or insufficient rest days may ‘overload’ the shin bones causing pain in your lower leg that most people refer to as shin splints.
The pain and swelling felt when you have hurt your shin bones will ease with rest but may flare up again frustratingly the next time you try to get out for a run. Left untreated it can become more severe and may eventually led to stress fractures of the shin bones.
Tips to help your shin splints heal
As with other types of sports injury you can relieve pain by applying an ice pack and taking painkillers but you must stop running and allow a minimum of 2 weeks’ recovery time, allowing any inflammation to settle fully.
At our Cambridge clinic we recommend resting until you can press on the bone without any tenderness and hop on the spot at least 12 times confidently and without any pain. Switch to lower impact activities such as cycling or swimming in the short term to maintain your fitness levels.
How to prevent shin splints – the underlying causes
While training errors are often a large factor, there are other things that may contribute like:
- Worn out, unsupportive trainers
- Tight or weak calf muscles
- Over-striding (poor running technique)
- Running mainly on hard surfaces
- Flat feet
- Weakness around the hips
If you don’t address all the underlying factors, then your shin splints are likely to come back again.
A sports physiotherapist will assess your individual weaknesses and movement patterns. They should prescribe a programme of targeted exercises to address any problems and make sure that you return to running again with a progressive plan for loading your shins in the right way so your symptoms don’t return.
Strengthening exercises to prevent shin splints
Here are three of our favourite exercises for runners to practice on their rest days:
Single leg heel raise

Keep your pelvis level and take your weight onto one leg. Press up onto tip toes keeping your knee straight. Repeat 15 times.
Single leg sit to stand


Stand up from a chair on one leg, then squat slowly to lower yourself back down to the chair with control. Repeat 10 times.
Single Leg bridge
Take home message:
Shin splints are a common injury particularly in runners and continuing to train will make things worse and can result in stress fractures of the shin.
Sufficient rest, strength and conditioning exercises and the right loading programme for returning to running is really important.
An experienced health professional will help you identify and address all the contributing factors to prevent recurrence.
If you think we can help you, please get in touch.
Related Articles
Share:
Book online or call us on 01223 914140

How long does it take to recover from a soft tissue injury?
Many people are surprised at how long a soft tissue injury (muscle, tendon or ligament) takes to heal and wonder why they’re not fully recovered and back to normal two or three weeks later.
Unfortunately, this is normal as the time it takes for your body to complete tissue healing is actually much longer.
So what actually happens when you sprain your ankle, damage your knee or strain some muscle fibres?
There are four main stages that your body goes through, although in reality these aren’t distinct and they all overlap:
Phase 1: Bleeding
Just like a cut to your skin causes external bleeding, a bruise is a sign of bleeding from your internal soft tissues. Muscles have a very good blood supply and therefore bleed more and for a longer time, often producing a large bruise. Ligaments don’t have a great blood supply so will bleed less.
It’s important to rest during this phase to allow time for the bleeding to stop (approx. 4-6 hours).
Phase 2: Inflammation (swelling)
Inflammation starts within the first hour or two after injury, peaks within 1-3 days but lasts at least a couple of weeks. This phase is when you will experience swelling and some heat around your injury.
This is entirely normal and a natural part of your body’s tissue healing process. It needs to occur and there is nothing you can do (or should do) to prevent it. Follow these treatment principles to improve your recovery time – P.O.L.I.C.E:
Protect – don’t try to push through pain and swelling. You can continue with activities as pain allows but rest when you are able, especially in the first few days, to allow healing.
Optimal Loading – keep the injured area moving within a comfortable range to maintain strength, flexibility and to trigger the next phase of healing.
Ice – this will largely help with pain relief very early on. Try applying an ice pack for up to 15 minutes, 2-3 times per day
Compression – you can apply gentle compression around your icepack using a towel. Compression bandages, like tubigrip, can be used at other times.
Elevation – keep the injured area supported and lifted while resting and especially when you are using an icepack.
Phase 3: Proliferation
Your body has to create scar tissue to repair your injury. This process starts at around 24-48 hours and it can go on for several months, normally stopping at around 4-6 months. So if you’re wondering why you still have some symptoms a couple of weeks after spraining your ankle or knee, it’s because your body is busily laying down scar tissue.
The key to helping your body recover during this phase is to gradually exercise in a pain free way that doesn’t overload the brand new scar but creates a bit of tension within it to build strength and flexibility.
Phase 4: Remodelling phase
Even when you are past the stages of pain and inflammation, your injury isn’t fully recovered. Ligaments, muscles and tendons all have different jobs in your body and your new scar must be taught behave like the structure it was formed to repair. At around 2-3 weeks your body starts to remodel the new scar to get it as close as possible to the original tissue. This process can actually continue for up to 2 years.
Your risk of reinjury is higher during this phase due to loss of strength, flexibility, balance and reaction time, so it’s really important to follow a proper rehab programme. Your programme should also take into account any underlying causative factors to prevent recurrence.
So what’s the take home message?
Firstly, inflammation and swelling is normal after an injury and takes longer to resolve than most people expect. And don’t panic if you’re not 100% back to normal within a few months. If you’ve had a very bad joint sprain, it’s possible that you might still experience some very minor issues up to a year down the line and you can still make a full recovery.
There are things you can do each stage to speed up healing, help your body create a better repair and prevent recurrence.
A physiotherapist will be able to advise you on the right treatment and exercises to carry out at the right time. We’ll also be able to get you back on track if things are taking a bit longer than expected.
If you think we can help you, please get in touch.
Related Articles
Share:
Book online or call us on 01223 914140

IT band syndrome – best exercises for runners
As one of the most common overuse injuries experienced by runners, you’ve probably heard of iliotibial (IT) band syndrome before but you may not know exactly what it is or how to treat it effectively.
You might have hip pain or thigh pain but the most common symptom of IT band syndrome is pain on the outside of the knee. A quick look at the anatomy and location of the IT band explains why:

Your IT band runs down the side of your thigh from your hip to the outside of your knee, helping to stabilise your pelvis and knee joints when you move. If the IT band becomes tight then it can rub on the thigh bone where it wraps around the side of your knee. This friction causes inflammation and leg pain.
Early treatment for IT band friction syndrome
- Don’t ignore the early warning signs of aching, this condition can become quite severe. The first line of treatment is to cut back on all activities that make your symptoms worse to a point where they are comfortable. For some activites, this may mean temporarily stopping altogether. This doesn’t mean doing nothing at all though … you can cross train in the short term to keep up your fitness levels. Swimming is ideal.
- Try gently massaging the painful spot with an ice cube in small circle for about 3 -5 mins to relief pain. Stop when the area goes numb to avoid an ice burn.
- Use a foam roller to massage and encourage better movement of the IT band:

Don’t bother trying to stretch your IT band, it’s not designed to lengthen like a muscle does. Stretch out around your hips instead for better results.
Exercises to help the IT band recover and to prevent recurrence
If your buttock muscles (glutes) are weak, smaller muscles around your hips have to work harder than they should. One of these small muscles – Tensor Fascia Lata (TFL) – attaches directly to the IT band, so if it is overworking this causes tension to build up in the band itself.
So to treat the underlying cause of IT band friction syndrome you have to strengthen your glutes while trying to keep the work for TFL to a minimum. Here are a few of our favorite exercises to achieve this.
Side-lying leg lifts
Side lying leg lifts are the most effective way of targeting your outer glutes, without firing up your TFL. It’s ideal for early stage rehab when your knee is still sore and it looks easy but lots of people don’t do this exercise correctly. Getting your leg in exactly the right position is the key:

- Lie on your good side.
- Straighten out your top leg and press back slightly, so it’s in line with your body.
- Imagine you are lying with your back against a wall and that you are sliding your leg up the wall as you lift it. Hold for 5 seconds and lower again.
- Repeat until fatigue
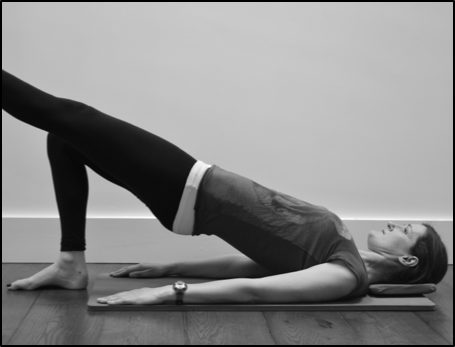
Single leg bridge
Single leg bridge is another great way of strength and conditioning exercise for runners:
- Lie on your back with your knees bent and lift up your pelvis
- Keep your pelvis level and straighten one leg. Hold for 5 seconds and repeat on the other side
- Lower and repeat 8 times
Standing side-steps with elastic exercise band
As soon as you are able, without causing any pain, it’s important to move on the strengthening your glutes while you are on your feet. Try side stepping into a resistance band:

- Tie an elastic exercise band round your thighs just above your knees
- Sink down into a mini squat position and slowly side step
When you’re pain free during all normal daily activities again, you can start to build up your running again. You’ll need to start at a comfortable level and increase things gradually. Interval training can be helpful initially.
If you think we can help you, please get in touch.
Related Articles
Share:
Book online or call us on 01223 914140

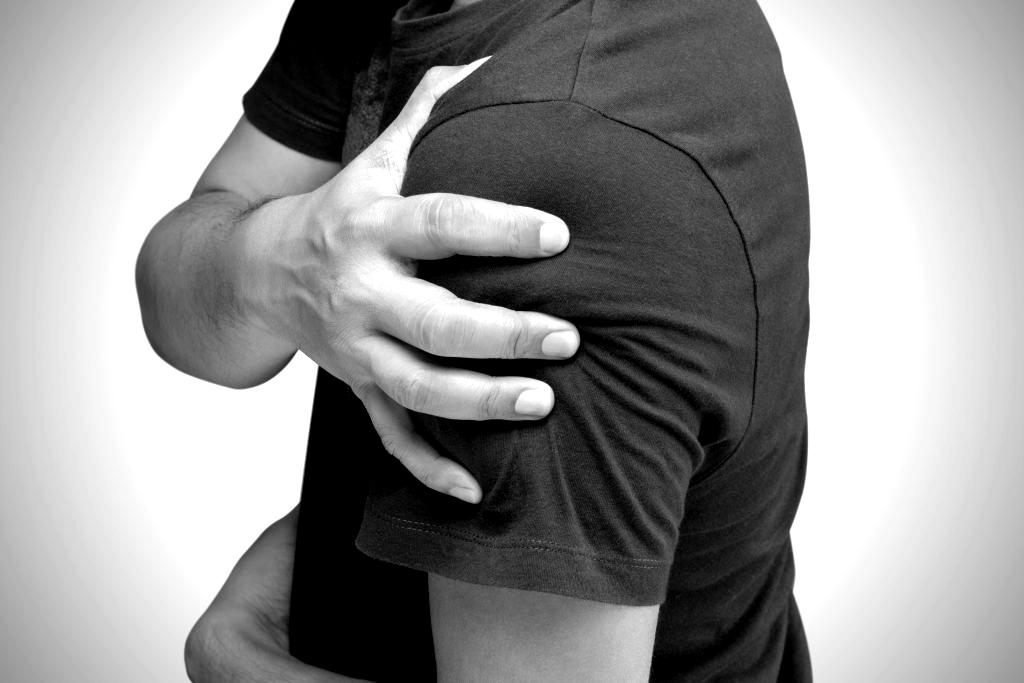
How to get rid of shoulder pain and prevent it recurring
If you are experiencing shoulder pain in certain positions or during specific movements, particularly reaching out to the side or overhead, then you may be experiencing a condition called shoulder impingement syndrome.
These days it’s often called subacromial pain syndrome and refers to shoulder pain caused by compression of the muscles that surround the ball and socket of the shoulder joint, the rotator cuff, and the bursae that sits above it:

What to avoid and how to treat shoulder impingement
Shoulder impingement syndrome is not the kind of condition where a ‘no pain, no gain’ approach is helpful. Pushing through the pain won’t fix this condition and can actually make things much worse. So in the short term it’s important to modify or stop doing things which are painful whenever possible to relieve your symptoms. This often means avoiding activities where you have to reach over shoulder height or movements that are repeated over and over again.
Medication or strapping your shoulder with tape will help for pain relief. Your GP might also recommend a steroid injection.
The best exercises to gently tighten the rotator cuff muscles without causing pain are called isometrics. Isometric exercises involve tightening the shoulder muscles by pressing your arm or hand against something immovable to create muscle tension but without moving your arm.
Isometric ‘press and hold’ exercises for the rotator cuff muscles
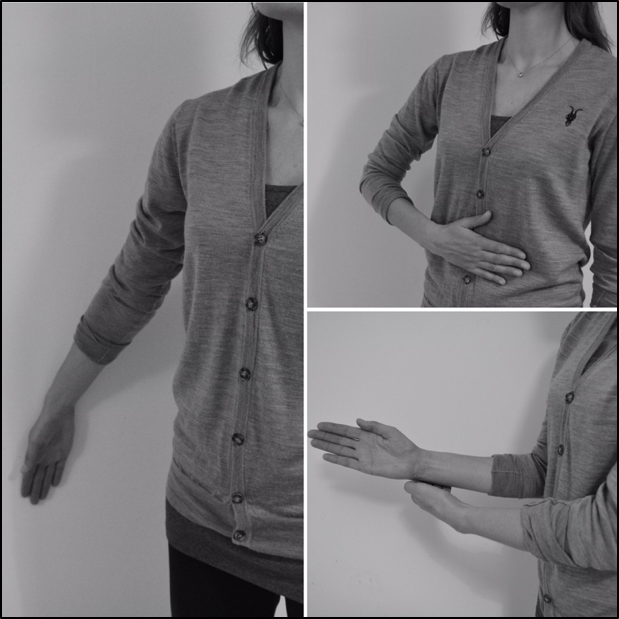
Stand side onto a wall. Press the back of your hand into the wall and build up the pressure until you are pushing firmly without provoking pain. Hold for 30 seconds. Press your hand into your tummy and hold for 30 seconds. Finally hold the back of your wrist with your good side and press outwards into your hand and hold for 30 seconds.
Repeat 4 times, every 2 hours.
Assessment of the underlying causes
There are lots of factors that can contribute to the development of shoulder impingement syndrome, so successful treatment is largely based on a comprehensive examination of the underlying causes.
A physiotherapist will complete a number of physical tests and may recommend hands on treatment in combination with an individualised programme of exercises to target underlying issues like weakness, poor movement patterns or a loss of flexibility.
Here are three of the exercises we often recommend in our Cambridge clinic:
Shoulder blade press ups on a wall:

- Stand with your hands on a wall
- Press the heel of your hands into the wall (imagine you are pushing the wall away from you) and feel your shoulder blades slide apart around your ribcage
- Relax and draw your shoulder blades back towards each other
- Repeat 15 times, keeping your elbows straight throughout the exercise
Assisted arm lifts

- Hold a stick between both hands and use your good arm to assist your bad arm to lift out to the side. Only do as much as you need to with your good arm in order to complete the movement comfortably
- Repeat 15 times slowly
Shoulder stretch

- Stand side onto a wall with your bad side
- Reach across your chest and use your good arm to gently increase the stretch
- Hold for 30 seconds and repeat 3-5 times
These exercises are recommended explicitly for shoulder impingement syndrome and not for other types of shoulder or neck pain. In fact, before starting any treatment a thorough examination to rule out any involvement of your neck (referred pain) and other shoulder conditions is strongly recommended, as treatment for these conditions may be different.
A physiotherapist will be able to advise you on the right approach and progress your exercises at the right time to restore full, pain free movement again.
If you think we can help you, please get in touch.
Related Articles
Nothing found.
Share:
Book online or call us on 01223 914140
Rehab for Runner's knee
Anterior knee pain, patellofemoral pain syndrome or runners knee …. these are all terms for pain felt at the front of your knee joint, under or around your knee cap.
Your knee cap sits in a groove on the thigh bone. If it moves out of the groove when you straighten your knee (maltracking), this can cause irritation and knee pain during everyday activities like walking and climbing stairs.
First aid for runners knee
In the early stages of healing, it’s important to reduce all activities that cause pain to a level where you can do them comfortably. For some activities, you might need to stop altogether for a short period. This is to allow your symptoms to settle.
During this phase, ice and taping can be helpful and your GP may recommend a course of anti-inflammatories.
Assessment of the underlying causes
Once your symptoms have settled the next step is to make sure that all the factors that contributed to your symptoms have been clearly identified. A comprehensive physiotherapy assessment will look at:
- Muscle weakness – in particular the thigh muscles (Quadriceps) and hip muscles (Glutes).
- Flexibility
- Control, balance and the way you move
- Running analysis
- Training patterns
Rehab for runners knee
Once all the factors contributing to your condition have been identified, a targeted rehabilitation programme can be prescribed according to your own specific physical issues. Alongside this, your physiotherapist will be able to help plan a gradual build-up of the activities you had to reduce or stop.
In this blog post, we’re just going to focus on muscle weakness and the types of strengthening exercises that might be recommended to you for the quadriceps and glutes. However, it’s worth bearing in mind that the key to effective treatment really is a full assessment because strengthening exercises might not work for you if the underlying cause is more to do with the way you move or training error, rather than muscle weakness.
Quadriceps and glutes strengthening exercises
For some people, strengthening the thigh muscles will be helpful to guide the knee cap smoothly in the groove of your thigh bone when you straighten your leg. Don’t bother trying to isolate one part of the quadriceps muscles, it’s best to work them together as a group. These four exercises are for early stage rehab when your knee is sore:
- Isometric quadriceps tightening

Sit with your leg out straight. Tighten your thigh muscles and hold for 30 seconds. Repeat 5 times.
- Inner range quadriceps strengthening

Sit with your leg out straight and a rolled up towel or foam roller under your knee. Tighten your thigh muscle and lift your foot up off the floor. Hold steadily for 10 seconds and lower slowly. Repeat 10 times.
- Straight leg raise

Sit with your legs out in front of you. Tighten your abdominals and your thigh muscles. Breathe out to lift your leg and hold reaching it away from you. Count to 6 seconds and lower slowly. Repeat 10 times.
- Clam

Lie on your side with your knees bent to 90 degrees and your hips slightly bent. Breathe out to lift your top knee, keeping your heels together. Breathe in to lower again. Repeat 15 times on each side.
As quickly as you are able, without making your pain worse, you need to move on to strengthening your muscles while standing, like this:
Mini squat

Stand with your feet at hips’ width apart and bend your knees slightly in a comfortable range. Make sure your knees stay in line with your toes. Repeat 15 times without provoking pain
When this exercise starts to feel easy then move onto lateral band walking. This exercise strengthens your quadriceps and glutes together:

Tie a band around your knees, just above the knee joint. Tighten your abdominals and bend your hips and knees slightly, keeping your back straight. Breathe out and step sideways with one foot. Breathe in to follow it with the other. Breathe out to step back again and in to finish. Repeat 10 times without straightening up.
Once a strengthening programme has been implemented it’s important to keep up with your exercises for at least 8-10 weeks in order for the muscles to become stronger. A physiotherapist will make sure they are progressed gradually and safely to allow you to get you back to your sport as quickly as possible.
If you think we can help you, please get in touch.
Related Articles
Share:
Book online or call us on 01223 914140

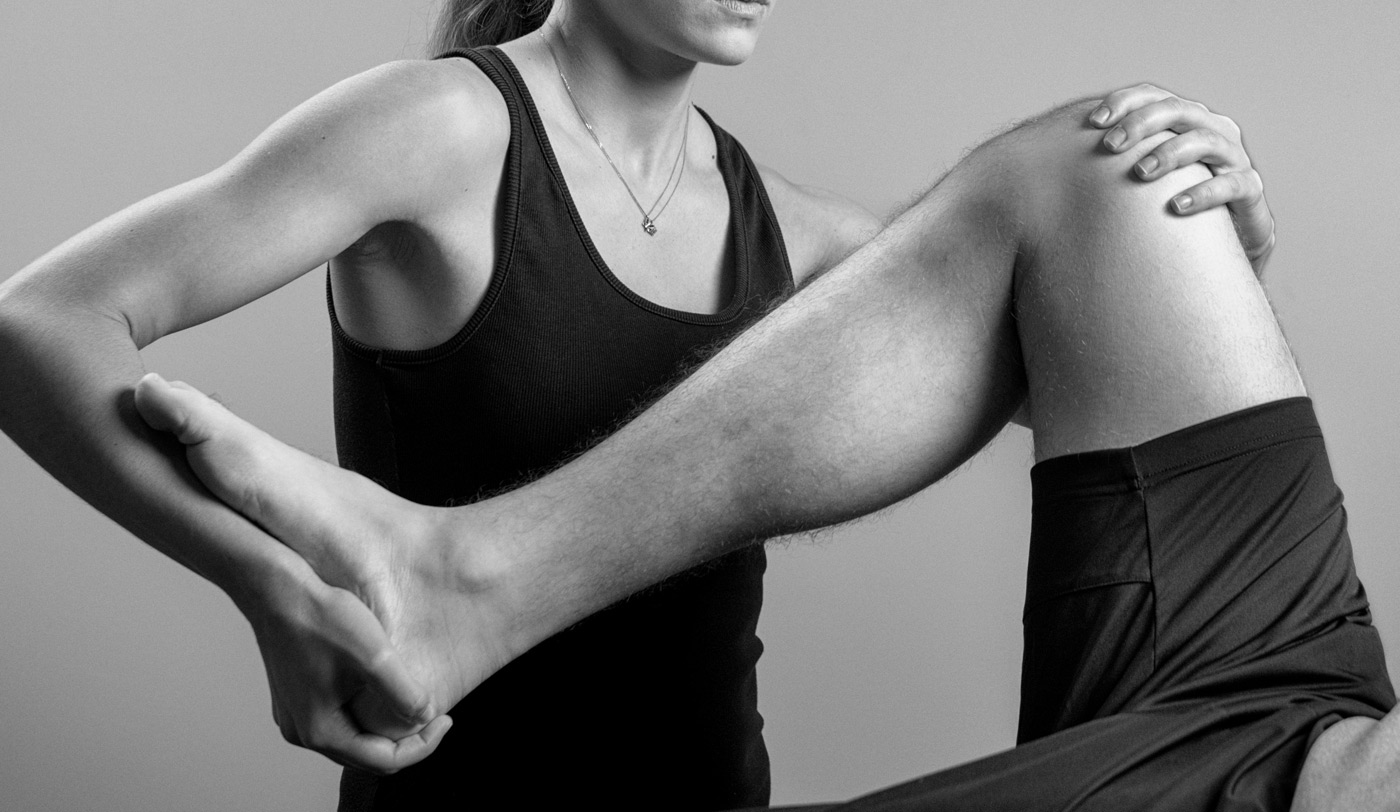
Hamstring tears - treatment and prevention
Most people are familiar with their ‘hamstrings’, a group of muscles that run down the back of your thighs.
These three muscles work together to straighten your hips (hip extension) and bend your knees when you move. So they’re working during almost all activities that require the use of your legs.
The most common type of sports injury to the hamstrings is a muscle strain or ‘tear’ during a sudden change of pace, for example sprinting or a high kick.
Muscles have a good blood supply so they can heal quite quickly depending on the severity of your injury. A small hamstring tear (Grade 1 tear) that feels a bit tight or sore in the back of your thigh but doesn’t interfere with your walking will recover in a couple of weeks. Visible bruising and swelling over the injured area indicates a Grade 2 tear. You are likely to be limping and this type of injury takes longer to repair. A complete tear (Grade 3 tear) of one of the hamstrings is very severe. You will have to use crutches to walk initially and it can take a whole season to recover.
How to prevent a hamstring tear
There are lots of factors that can lead up to a hamstring injury but muscle imbalances, overtraining and deconditioning are three common issues we see in our Cambridge clinic.
Your hamstrings are supposed to help your buttock muscles (glutes) to move your hips but they shouldn’t have to do all the work. If you have weak or lazy glutes then your hamstrings have to work much harder than they should which puts you at risk of developing a tear.
Our muscles also need time to adapt to training. A sudden increase in your training routine or over training without sufficient ‘rest’ days means that your hamstrings may become tired and this weakened state makes them are more vulnerable to injury.
Finally muscles that are unfit (deconditioned) are more susceptible to injury. Strength and conditioning exercises should be an integral part of any training programme. However, these exercises to have the most benefit they must be tailored to the demands of your particular sport. A physiotherapist that specialises in sports rehabilitation will be able to advise you but here’s one of our favourites:
Nordic curls for hamstrings

Hook your feet under something stable (or work with a partner) and bend your ankles, so your toes are tucked underneath you. Cross your hands initially across your chest, tuck your tailbone under slightly and draw in your abdominals. Lean forwards as far as you can, without pain or cramping, then lower down with control onto your hands. Push back with your hands for some momentum but use your hamstrings to lift yourself again. Repeat 5 times.
So if you’re keen to prevent a hamstring tear - or you’re recovering from one - we recommend strengthening your glutes and hamstrings, training steadily without sudden changes in volume or load and taking your rest days.
As always, please get in touch if you have any questions,
The Physiofit Team!