
Ankle Sprain - recovery time and exercises
Ankle sprains are incredibly common and most people will experience a sprain at some point during their lifetime. They are one of the most common sports injuries, especially those involving running or jumping. However, they can just as easily occur walking along a pavement or misplacing your foot stepping off a curb.
The most common form of ankle sprain is an ‘inversion’ injury. This is where your ankle rolls inwards, injuring the ligaments around the outside of your ankle.
Ligament injuries are classified according to their severity from a grade 1 injury, where a few fibres in the ligament are injured, to a grade 4 injury where the ligament is completely torn. Most people will experience a sprain which would be classified between grades 1 and 3. These respond well to physiotherapy treatment but while they are generally not serious, correct rehabilitation is important to prevent longstanding ankle issues.
Recovery time and best treatment for an ankle sprain
For the first 2-3 days after an ankle sprain the focus should be on controlling pain. Tissue healing can take 6-8 weeks to get fully underway, so don’t be concerned if you’re not back to normal within a week or two.
The key thing to remember in the first few days is relative rest … keep your ankle gently moving but stay off it as much as possible. If you are limping it might be helpful to use a walking aid (crutches, a walking stick or a hiking pole) for a few days.
Your ankle is likely to feel warm and swollen, this is normal and required to help your soft tissues heal. You may also experience some bruising around your ankle and this can track through the tissues into your foot. It’s important to let your inflammatory response run it’s course for the first 48 hours as this kick-starts the next stage of tissue healing. Avoid anti-inflammatories such as ibuprofen or naproxen as these can delay tissue healing if taken at this stage. If you require painkillers speak to your GP or a pharmacist about paracetamol or codeine.


Sprained ankle exercises
In the first week the key exercises are gentle range of movement exercises. Although it will be painful, you need to keep your ankle moving. Do this a little every hour but do not push right through pain:
Ankle bend – in sitting, gently pull your foot up towards you then return to neutral. Repeat 5-10 times.

Ankle point – in sitting, gently point your foot away from you the return to neutral. Repeat 5-10 times.

Foot turn in – in sitting, gently move your foot inwards then return to neutral. Repeat 5-10 times.

Foot turn out – in sitting, gently move your foot outwards then return to neutral. Repeat 5-10 times.

Precautions
If you experienced significant swelling within a few minutes of injuring your ankle and you are unable to put any weight at all through your foot or ankle, it’s possible that you may have suffered a fracture as opposed to a sprain. If you go to your local A&E, an x-ray can be completed to confirm whether this has occurred.
If you think we can help you, please get in touch.
Related Articles
Share:
Book online or call us on 01223 914140

Plantar fasciitis - causes, symptoms, treatment and exercises
If the first few steps of each day feel you’re like walking on broken glass, then it’s possible you have a condition called plantar faciitis (a.k.a plantar fasciopathy).
This stubborn condition comes on gradually, causing acute heel pain after resting and without treatment these symptoms can linger on for for a long time and periodically recur.
What is plantar fasciitis?
The plantar fascia is a thick band of tissue connecting your heel and the base of your toes, which supports the arch of your foot when you move around. Accumulative strain in the plantar fascia can cause pain over time, either in your heel or in your instep (or both). The clinical term for this is plantarfaciitis.
As with most overuse injuries, there are usually several underlying factors which all have the potential to contribute to this issue such as:
- Low arches in your feet
- Stiff ankle joints or tight calf muscles
- Weakness of the deep muscles in the soles of your feet
- Poor strength around your hips
What are the best exercises for plantar fasciitis?
A physiotherapist will be able to examine you for all the underlying factors and provide you with an effective treatment programme targeting the problems which are specific to you.
In the short-term you will need to avoid or decrease any activities that flare up your heel pain. A gel insert to support your heel can also be helpful, particularly if you are wearing work shoes.
Warm up your feet using a spiked ball:

Strength training
Before you start, roll up a towel and lift up onto tip toes. At the top of the movement your toes should be pressed back as far as they can be, if not adjust the thickness of the towel:

This exercise must be completed slowly, three seconds going up, two seconds pause at the top and three seconds coming down.
You need to establish the heaviest weight you can lift onto tip toes – for one repetition – giving it your maximum effort. This is your one-repetition maxmimum (1RM).
This might simply be your body weight with both feet on the ground or on one leg, as you get stronger you can use a backpack and add books to the pack to increase the load.
Start with 12RM for three sets, every other day. After two weeks increase the load as recommended above but reduce the number of repetitions to 10 RM for four sets. At four weeks, increase the load again and complete 8RM for 5 sets. Continue the exercises adding more load as you get stronger until you reach three months, even if your heel pain resolves in the meantime (you don’t want it to come back again).
It’s nothing to worry about you experience some pain during this exercise but it shouldn’t persist afterwards or cause a flare up in your symptoms later.
Calf stretches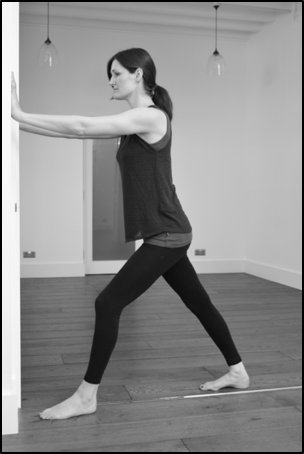

Stretch out your calf muscles, hold each stretch for 30 seconds, rest for 10 seconds and repeat three times:
Nerve gliding
Lie on your back with your knee bent and bend your ankle. Turn the sole of your foot outwards and holding this position bend and straight your knee. Repeat up to 30 times within a comfort zone.
Plantar Fascia stretch 
Take hold of your toes and bend them backwards until you feel a stretch in the arch of your foot. Hold for 10 seconds, repeat 10 times, up to three times per day.
So what’s the take home message?
Plantar faciitis responds well to treatment but you have to be diligent with your exercises or they won’t be effective.
Plantarfaciits also responds well to shockwave therapy but this is also more effective if you have a strong rehab programme in place.
If you think we can help you, please get in touch.
Related Articles
Share:
Book online or call us on 01223 914140
Benign Paroxysmal Positional Vertigo (BPPV)
One of the most common causes of dizziness is a condition called benign paroxysmal positional vertigo (BPPV) which affects the motion sensors inside your inner ear causing vertigo.
Our patient’s often experience short episodes of dizziness (lasting less than 60 seconds) which are triggered when they move their head into different positions. Rolling over in bed is quite a common trigger, but really any activity involving a change of head position can cause symptoms.
Some people also experience nausea with the dizziness, but it’s not normally associated with headaches, hearing loss, altered mental ability, loss of consciousness or visual disturbances. So if you have any additional symptoms or your dizziness follows a different pattern, we’d recommend seeing your GP first.
What causes BPPV?
Your inner ear has three circular strutures (canals) filled with fluid which work a bit like a spirit level to sense motion and determine the position of your head.
Small crystals which are naturally present in your ear canals can become detached after an injury like whiplash, after an infection or as a result of aging. These crystals disturb the motion sensors in the ear canals, causing false signals and vertigo.
Anyone can develop BPPV but it’s more common in women and the number of cases increases every decade as we age.
How can we test for BPPV?
Whilst BPPV can have a huge impact on quality of life and can feel very disconcerting, it is actually quick and easy to diagnose and treat.
Your GP or an experienced physiotherapist will be able to tell whether you have BPPV by completing a Dix-Hallpike test. It’s non-invasive and very quick to perform.
The clinician will move you from a siting to a lying while moving your head into to a certain position. If BPPV is present, this will trigger your vertigo symptoms along with nystagmus (a rapid flickering of your eyes). These symptoms will resolve within 60 seconds.
BPPV does resolve slowly on its own but the recommended treatment (Epley Manouvere) only takes a few minutes and your symptoms are likely to be fully resolved in 2-3 sessions. It’s very quick and effective and actually quite a similar procedure to the Dix-Hallpike test, where the clinician makes specific changes of your head position whilst you are lying down to move the crystals out of the ear canals.
If you suspect you are suffering from BPPV or have any further questions please don’t hesitate to get in touch,
The Physiofit Team!

Achilles tendon pain (tendinopathy), best advice & exercises
Whether you’re sporty or sendentry, male or female pain in the Achilles tendon is common problem.
If you’re suffering with a problem with your Achilles tendon then it’s likely to be tender to touch and may feel stiff, particularly in the morning. Pain during the type of exercise that involves direct impact, such as running and walking, is also common.
What is an Achilles tendinopathy?
Your Achilles tendons are the biggest, strongest tendons in your body. They attaches your calf muscles to your heel bones, helping you to lift your heel and propel forward when walking or running.
Your Achilles tendons adapts rapidly to cope with the demands of your activites. However, pain can develop if you exceed it’s capacity to adapt and an imbalance develops between the ‘wear and repair’ processes in the tendon. We call this process tendinopathy and as physios we think about this process in two different stages, which acts as a guide to the best treatment:
- Reactive stage
This is the very early stages of a tendinopathy. During this stage there may be some thickening of the Achilles tendon, stiffness and pain. This stage is completely reversible and the tendon will return to a normal, pain free state again if managed appropriately.
The best advice is to reduce all activities that cause pain to a level where you can do them comfortably. Unfortunatley, for some activities you might need to stop altogether for a short period. This is to allow your symptoms to settle. During this phase, ice and taping can be helpful and your GP may recommend a course of anti-inflammatories.
Once your symptoms have settled it’s vital to build up any previously painful activites in a very structured way and a physiotherapist can help with this.
- Degenerative stage:
This stage is the next step on from the reactive phase. It’s associated with persistent pain and normally more in the middle-aged population. It can happen if the reactive stage is not managed appropriately and excessive pressure has been placed upon the Achilles tendon repeatedly.
In this stage your Achilles tendon will be thickened more with nodular sections and there are physical changes in the structure of the tendon which would be seen on an ultrasound scan. These changes are not reversible but appropriate treatment to strengthen the tendon mean that it can function is a pain free way again.
What are the risk factors of developing Achilles tendinopathy?
Excessive and sudden increases in exercise are often the cause of developing tendinopathy however there are some other risk factors linked to this issue such as your age, your body weight, being diabetic, tightness or weakness in the calves or less optimal movement pattern causing increased pressure on the Achilles tendon.
A physiotherapist would be able to advise you of all the underlying factors that may have contributed to your symtpoms and this would be taken into account in recommending an appropriate treatment programme.
What are the best exercises for strengthening the Achilles tendon:
Isometric ‘press and hold’ exercises are recommended to relieve pain for all patients suffering from Achilles tendon pain, whether in the reactive or degenerative phases of this condition.
Depending on the severity of your symptoms, you can practice these exercises either with both legs (slightly easier) or on one leg.
Hold each lift for 45 seconds and repeat 5 times.
Take a break of 15 seconds in between each repetition.
Repeat up to 4 times per day.
The benefits of Shockwave therapy for Achilles tendon pain
Shockwave therapy is recommended if you are in the degenerative stage of tendinopathy. It’s a mechanical treatment applied to the tendon which kick starts the healing process again and relieves pain.
Please don’t hesitate to get in touch if you have any further questions.
The Physiofit team!

How to use a TENS machine to relieve back pain
You might have been recommended a TENS (transcutaneous electrical nerve stimulation) mechine as part of your treatment for back pain. This helpful medical device won’t ‘cure’ your symptoms but it can provide short-term pain relief and it’s a useful alternative or addition to pain medication.
What is a TENS machine and how does it work?
A TENS machine is a small battery-powered unit which adheres to your skin via sticky pads called electrodes. The electrodes trasmit small electrical impulses, creating a tingling or pins and needles sensation in your skin which distracts the nerves in the area to reduce pain signals and help relax muscle spasm. The effects can last for up to 4 hours afterwards.
How to use a TENS machine properly
Each individual TENS unit comes with an instruction manual which will explain the different settings and most include pictures to show you where to stick the the electrodes. Every brand of machine is slightly different so please do read your instruction manual.
You can choose to use either 2 or 4 electrode pads depending on how large the area of pain is that you are treating.
If your lower back pain is on one side, try using two electrodes. Place one pad at the top point of the pain and one pad below (about 1 inch apart). Try to place the pads on the muscle as opposed to directly onto your back bones:

If you have pain in the middle of your back or either side of your spine, try using 4 electrodes. Place placing one electrode either side of your spine at the top point of your pain about 1 inch out from the spine. Place the other two either side of your spine at the base of your pain, again 1 inch out from the spine:

The unit itself can be hooked onto a belt loop or the top of your trousers, so you can carry on with your normal activities whilst using it.
Settings
- For pain that has started recently (acute pain) – use the ‘constant’ or ‘normal’ setting. Set the pulse rate to between 80Hz – 120Hz and a pulse width between 175uS – 200uS.
- For pain you have had for more than a few weeks (chronic or persistent pain) – use the ‘modulation’ setting to prevent your body getting used to the stimulation, which would make the unit less effective. Set the pulse rate to between 2Hz – 10Hz and a pulse width between 175uS – 200uS.
- Time – you can leave your machine on for 30 to 60 minutes at a time and use around 4 times a day. If you have the machine on constantly throughout the day you will find it becomes less effective.
Do not use TENS without first seeking medical advice if you have any of the following:
- Pacemaker/heart problem
- Epilepsy
- Pregnancy – do not use during the first trimester. TENS can be used later in pregnancy but please consult a medical practitioner first.
- Do not use to mask undiagnosed pain
Other precautions:
- Do not drive, shower/bath or sleep whilst using your TENS machine.
- Do not apply heat or ice to the area at the same time as using the TENS unit.
- Do not place the electrode pads over broken skin, near/over your eyes, at the front/sides of your neck, over your mouth, over any numb areas of skin or on your abdomen during pregnancy.
Most people do not experience any adverse side-effects to using TENS. However very occasionally your area of pain may become more sensitive – if this occurs then stop using immediately. Some people may also experience a reaction to the electrode pads, such as itching/rash. Again, stop using immediately if this occurs.
Get in touch with us now
Related Articles
Share:
Book online or call us on 01223 914140

ACL repair, reconstruction and rehabilitation
Not everyone who tears their anterior cruciate ligament (ACL) requires surgery to repair it.
Your decision will depend on the extent of the tear, how stable your knee feels, your lifestyle and the sports and hobbies you normally take part in.
For example, if you have fully ruptured your ACL and you normally participate in a sport which requires lots of sudden movements, like football or squash, then it’s more likely that you will require a surgery.
If you do opt to have surgery, you’ll be given post-operative instructions for your rehabilitation from your consultant which will be specific to you, so please do follow this advice even if it differs slightly from our recommendations.
Tips for recovery in the first few weeks following ACL surgery
Take your painkillers as prescribed - the first few weeks following your surgery are a critical time for regaining knee movement and strengthening your muscles. Your process will be much slower if you aren’t able to move very well because of pain.
Apply regular ice packs – a packet of frozen peas or a gel pack are ideal. Wrap your ice pack in a in a wet towel towel and place it on your knee for about 15 minutes. If you notice your skin has gone numb during this time then remove the ice pack straight away to prevent a burn. This can be repeated as often as you like to help relieve pain and also reduce excessive swelling.
Use your crutches - you are likely to be given elbow crutches prior to leaving hospital to help with your walking. Don’t be in a rush to abandon them too quickly… it’s better to be able to walk with a normal pattern of movement using your crutches for support then limp without them. As your pain starts to reduce you can gradually progress onto one crutch (held in your opposite hand).
Pace yourself – your body will need time to rest and heal after your surgery, so if your has issued you with a knee brace to protect your graft, use it at the settings advised for the length of time they recommend
ACL recovery exercises - early stage
Knee press

By the end of the first week you should aim to be able to straighten your knee fully. As often as possible sit on your bed or the floor and try to straighten your knee as far as possible, hold for 5 seconds then relax. Do not push through pain. Repeat 5-10 times
Knee bends

You should be able to bend your knee to about 70 degrees by the end of the first week, gradually increasing this in subsequent weeks. Sit on the floor or your bed with a plastic bag under your foot. Slide your foot towards you, bending your knee as far as able without pushing through pain. Hold for 5 seconds then return. Repeat 5-10 times.
Quadriceps strengthening- straight leg raise

Lie on your back of sit up supported with your legs out straight in front of you. Tighten your thigh muscles then lift your whole leg, keeping your knee stays straight. Hold for 5 -10 seconds the relax. Repeat 5-10 times.
Hip strengthening

1. Lie on your good side with back to a wall. Bend your good leg underneath you and keep your operated leg straight. Place your heel on the wall behind you and slide it up the wall. Hold for 5-10 seconds the relax. Repeat 5-10 times.

2. Lie on your front over a couple of pillows. Bend your knee as far as is comfortable and lift your leg slightly, without arching your lower back. Hold for 10 seconds then relax. Repeat 5-10 times.
The majority of people are able to get back to all their usual activities and sports over a period of 3–9 months. An experienced physiotherapist will be able to support your recovery from ACL surgery with a structured rehab programme focusing on mobility, balance, control, strength and sports specific drills to ensure the long term success of your surgery.
Please don’t hesitate to get in touch if you have any questions at all,
The Physiofit Team!

Patellar Instability - symptoms, causes & best treatment

What is patellar instability?
Your patella (knee cap) is a small triangular bone that sits in a groove at the bottom end of your thigh bone (femer). As you bend and straighten your knee, your patella slides up and down in this groove, controlled by ligaments and muscles.
If your patella doesn’t stay fully in the groove, either during movement or when you are resting, this is called patellar instability.
What are the main symptoms?
If you have patellar instability it’s likely that you will have some pain around the front of your knee and possibly swelling. Your knee might also feel weak or loose and you might feel like you don’t trust it fully to support you.
The symptoms range from minor laxity, where the knee cap moves slightly out of the groove causing a distinctive clunking sensation (patellar maltracking), to dislocation of your knee cap altogether. Dislocation can be momentary, where the patella relocates itself or it may dislocate and stay out until it is manipulated back into position.
Unfortunately, the more times your knee cap dislocates, the more stretched and lax the supporting ligaments become, making the chances of another dislocation higher over time. This is why it’s so important to not ignore your symptoms and to complete an effective rehab programme to strengthen the muscles that stabilise your knee cap.
Why does your knee cap dislocate?
There are two main types of patellar instability, the first is caused by a direct injury to the ligaments around your knee cap. This tends to be a sporting injury where the knee cap has received a blow on the side, causing it to move sideways either fully or partially (subluxation) out of its groove. This will lead to some ligament damage and laxity.
The second type of instability is due to an underlying structural issue that predisposes you to excessive movement of your kneecap in its groove. You might have a shallower groove in your thigh bone or your knee cap might be very small or located very high up in front of your knee (patella alta). If your thigh muscles are weak or you have hyper mobility syndrome, where your ligaments are naturally quite lax, these are also common causes.
Best treatment for patellar instability
If you have experienced a dislocation, your knee will likely swell for a few days and feel stiff and painful. Depending on the severity of the dislocation some people are issued with a knee brace. The length of time this is worn for varies from person to person and will be decided by a consultant.
In the early stages after a dislocation you will need to rest your knee and allow it to heal. Pace your activites and avoid things that cause pain. Take any medication which is prescribed for pain relief or to reduce swelling and apply an ice pack regularly for up to 20 minutes, three times per day.
If walking is uncomfortable try using a walking stick or hiking pole for a few days, holding it the opposite side to your affected knee.
Early stage exercises for patellar instability
Knee bends

Sit in a chair or lie down on your back with your leg straight. Bend your knee as far as comfortable.. Repeat 5-10 times. Do not push through pain.
Knee press

Press the back of your knee into the floor and hold for 5 seconds then relax. Repeat 5-10 times.
A physiotherapist will be able to guide you through a rehab programme of exercises to restore movement, strength and control around your knee. Some people do require surgery following patellar dislocation but this is normally only considered if you have not been successful following an appropriate programme of strength and conditioning exercises for at least 3 months.
If you think we can help you, please get in touch.
Related Articles
Share:
Book online or call us on 01223 914140

Urinary incontinence in men and women - causes & treatment
Whether you are male or female, young or old, about a quarter of the population will experience an issue with incontinence at some point in their life.
What is urinary incontinence?
Urinary incontinence is classified according to the type of symptoms experienced by each individual, such as:
- Stress incontinence: leaking of urine when you cough, sneeze or on physical exertion such as jumping or lifting something heavy.
- Urge incontinence: a sudden urge to pass urine and not being able to hold on for very long. With this type of incontinence, it’s likely that you will be going to the toilet frequently and you may experience some leakage after you’ve just emptied your bladder (dribbling).
- Overflow incontinence: being unable to empty your bladder fully and experiencing a mixture of the features of both stress and urge incontinence.
What causes urinary incontinence?
Urinary incontinence is sometimes due to weakness of the pelvic floor muscles. However, for some people strength isn’t the issue at all and the problem is due to difficulty coordinating their pelvic floor muscles to tighten effectively when needed.
Pregnancy or excessive weight gain, abdominal surgery or child birth may result in an increased pressure on your pelvic floor which is a common cause of stress incontinence.
Excessive alcohol or caffeine intake, poor fluid intake, constipation, urinary tract infections (cystitis) or the side effects caused by medication such as hormone replacement therapy (HRT), diuretics and some antidepressants have all been linked to urge incontinence.
How is urinary incontinence treated?
First of all, it’s important to determine the underlying cause of your incontinence. Seeing your GP or a physiotherapist specialising in pelvic health will be able to assess your condition fully and advise.
You can expect to be asked questions about your lifestyle and bladder habits, including how often you drink, what you drink, how frequently you use the toilet and how much urine you normaly pass. So it’s worth thinking about this beforehand and perhaps keeping a record for a few days to take with you to your first appointment.
Your physical assessment may include an internal examination to assess the strength and condition of your pelvic floor muscles. This will help to guide the treatment approach.
Everyone is different, therefore the treatment of urinary incontinence will vary from person to person and you will get better results if your treatment is tailored to your own individual needs.
Although this condition is more common in women, we also see a number of men with urinary incontinence. The important thing is to recognise that although these symptoms are common, they aren't normal and can happen at any age. The key is to seek treatment as early as possible.
If you have any questions at all or you’d like to discuss your condition, please don’t hesitate to give us a call.
The Physiofit team!
Pelvic floor weakness - symptoms, causes & exercises

Problems with the muscles of your pelvic floor are so common that many of us accept this as normal, especially as we get older or after having a baby. However, pelvic floor problems are not inevitable and up to 80% of women suffering with issues like incontinence, prolapse or an overactive bladder can be successfully treated by a women’s health physiotherapist.
How to tell if you have a problem with your pelvic floor – signs and symptoms
The pelvic floor muscles blend together to form a hammock that runs from your tailbone to your pubic bone. They are supported by strong ligaments that help your pelvic floor muscles hold your internal organs in place and allow us to move around, walk, run and jump without unwanted urine leakage.
The most common signs that you might have a problem with your pelvic floor include:
- The sudden need to go to the toilet and sometimes not making there in time
- Feeling like you always need to go to the toilet and going very frequently
- Leaking when you cough, sneeze or physically exert yourself
- A feeling of heaviness in your vagina or rectum
- Vaginal pain
- Lack of sensation or pain during or after having sex
Why do pelvic floor problems develop – causes
Having a healthy pelvic floor means that your pelvic muscles are able to work well together, tighten sufficiently and release, so you can easily control or empty the bladder and bowel at the appropriate time.
Weak, over-stretched, slow-working, tight or damaged pelvic muscles are likely to result in some of the signs and symptoms above. These conditions can develop during to pregnancy or after childbirth, if you have a job that involves heavy lifting or you take part in a type of high impact exercise or if you have chronic constipation and need to strain to empty your bowels. Menopause can also lead to problems with your pelvic floor due to the hormonal changes affecting women.
Exercises to strengthen your pelvic floor
Like any other muscle in your body, you are able to retrain your pelvic floor muscles with the right exercise programme.
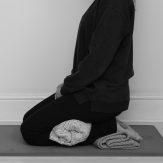
Strengthening exercises may be recommended to you as part of this programme. Here’s how to find and tighten these muscles correctly. A good position to feel the pelvic floor muscles working is in high kneeling:
Breathe out and imagine you are drawing a marble up your back passage to gently lift your pelvic floor and draw it upwards towards your pubic bone. You should feel a slight lift and tightening sensation. Hold for a moment and then relax as you breathe in and imagine your sitting bones melting into your heels.
Your pelvic floor muscles need to be able to tighten quickly in case you sneeze and be able to hold to allow you to get to the toilet, so it’s important to practice both ways with short, quick lifts (be sure to relax fully after each one) and long, slow holds.
For some women the strength of their pelvic floor muscles is actually okay but the inability to coordinate them to work together effectively can be a problem. So if you are still experiencing symptoms after 6-8 weeks training it is worth having a pelvic examination with a specialist women’s health physiotherapist because, like any other exercise programme, pelvic floor exercises are most effective when they are tailored specifically to the individual.
Don't hesitate to get in touch if you have any questions.
The Physiofit Team!

Neck pain due to a ‘trapped nerve’ - exercises and advice
The phrase ‘trapped nerve’ conjures up quite an unpleasant picture and it isn’t really a great way to explain what’s actually happening in your body when you get nerve pain.
It’s also quite commonly blamed for lots of different types of neck pain, regardless of the underlying cause. In fact, if you don’t have any symptoms in your arms or hands like pain, pins and needles, tingling, numbness or weakness then it’s unlikely that you have a problem with one of the nerves in your neck at all.
Even though the sharp ‘zing’ of pain, when you move your neck, may remind you of a nerve, if your symptoms are only felt in your neck, they’re more likely to be coming from the joints or muscles.
What is a trapped nerve?
Nerves travel out in bundles from your spinal cord through tunnels formed by the bones of your spine (vertebrae). A true ‘trapped nerve’ occurs when one of your nerves is compressed by an extra bit of bone growing (osteophyte) which narrows the nerve tunnel. It can also occur if you have injured one of your discs and part of the disc is pressing directly onto the nerve.
When a nerve is truly compressed, there is always a predictable pattern of numbness or loss of feeling in the skin, a loss of strength in your arm or hand and your reflexes will be absent or reduced when they are tested.
It’s not actually that common and if you are experiencing symptoms down your arms spreading from your neck then you are far more likely to have a form of nerve irritation, rather than a trapped nerve.
Nerve irritation and neck pain
Your nerves can become inflamed like any of the soft tissues in your body. This can happen suddenly after an accident, like a whiplash injury or can develop gradually due to accumulative strain.
When you move your neck and shoulders to reach for something or look around, the nerves around your neck stretch and move too. This is entirely normal and you won’t experience any symptoms unless you stretch a nerve beyond 5% of its original length.
When a nerve is inflamed or irritated it becomes more sensitive to stretch. This means that it will start hurt from just a 3% stretch, which is well within the range it should actually be able to tolerate. Put simply, your nerve still has the capability of moving and stretching as it should, but it has become more sensitive and thinks that you are stretching it too much, even when you’re not. This is why you may suddenly find that everyday arm movement causes pain or pins and needles.
How to reduce nerve irritation and sensitivity
Even if you are experiencing numbness or some weakness in your arm, this can often be treated and resolved with physiotherapy, so try not to panic.
Controlling your pain is important to enable you to move your neck and shoulders, which helps your nerves to settle and become less sensitive again. Try over-the-counter pain control first. If this does not help, then discuss trying some neuropathic pain control medication with your GP. Try propping your arm on some pillows while you are sitting and use a wheat pack or hot water bottle to apply some heat to relax tight muscles around your neck for up to 10 minutes.
We recommend these exercises but be aware that nerves prefer gentle continuous movement, so don’t hold these positions, just move into them and then back out of them again. Don’t push into pain, just move within a comfortable range that doesn’t increase your neck or arm symptoms. Start by rolling your shoulders back 5 – 10 times:
Neck bend

Sitting, take your chin down towards your chest. Return. Repeat 5-10 times
Neck turn

Sitting, turn your head to look over your shoulder. Return. Repeat 5-10 times in both directions.
If you think we can help you, please get in touch.
Related Articles